Skip to content

#WednesdayWrite: A Reply-All Scenario

#WednesdayWrite: A Reply-All Scenario published on 43 Comments on #WednesdayWrite: A Reply-All Scenario

Screenshot of Google Gmail Inbox links
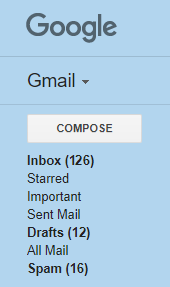
The members of your writing group need to plan and write a short report on successful strategies for the job search. Your group has had two meetings in Google Hangouts so far, after which members have emailed and Replied to All, with everyone getting lots of emails with long threads about the report.

Two team members, Jasmine and Malik, are responsible for strategies for LinkedIn. Jasmine did research on what employers look for on LinkedIn, and she emailed her research to Malik without copying the writing group. Malik replied to Jasmine to ask a question, and he copied the other group members. Jasmine replied to Malik—not to all.

Malik is annoyed with Jasmine. He says they should be copying everyone in the writing group on everything they do so that people are in the loop.

Jasmine thinks they are drowning in email. She says they should only copy the entire group when everyone needs the information.

With whom do you agree? Why? Discuss with those who comment on the post.


Photo credit: Detail from Gmail – Inbox by Gustavo da Cunha Pimenta on Flickr, used under a CC-BY-SA 2.0 license.


#TuesdayTutorial: Taking a Professional Photo

#TuesdayTutorial: Taking a Professional Photo published on 37 Comments on #TuesdayTutorial: Taking a Professional Photo
Bathroom mirror selfie. Self Portrait in Barbados by Jens karlsson on Flickr, used under a CC-BY license

Don’t Use This Bathroom Mirror Selfie

Professional Photo with clean, gray background. Me for Lindberg glasses by Jens karlsson on Flickr, used under a CC-BY license

Use This Professional Photo Instead

The Professional Bio Statement that you are working on for your first major project needs a professional photo that shows readers both what you look like and something about your personality and style. I know that none of you would use a bathroom mirror selfie, but based on what students have submitted in the past, I want to provide some specific guidelines.

What to Wear

  • Wear the kind of clothes that you would wear to work or to an interview. Be professional.
  • If you are pursuing a military career or currently in the Corps, a photo in your uniform works for this assignment.
  • Don’t use a photo in which you are wearing formalwear. Ring Dance or Wedding photos of you in a tux or formal dress are not appropriate. Your readers will know you are trying to make-do with a photo that was clearly for another purpose.

Choose Your Setting

  • Take your photo in a neutral location or in the kind of workplace where you hope to be employed. For instance, a photo on a construction site would be fine if you’re a building construction major.
  • Alternately, take your photo in a location that relates to your career. If you are a planning to be a veterinarian, you can take a photo with your horse in the stable or outside with your dog.

Eliminate Distractions

  • Be sure there is nothing unusual in the background of your photo. Check for anything that is out of place. You want your readers to focus on you, not the background.
  • Ensure that the photo focuses on you. Your significant other and friends do not belong in the photo. Crop out anything that doesn’t belong.

Read More

You will find a lot more useful tips in the step-by-step tutorial in the Hubspot post How to Take Your Own Professional Headshot: A Bookmarkable Guide, which says it takes 15 minutes to read. The article covers everything from how to set up your camera to editing your final choice.

Take advantage of feedback from your writing group as well. If you can’t decide which photo is best, ask them to help you decide.


Photo credits: Self Portrait in Barbados by Jens karlsson on Flickr, used under a CC-BY license, and Me for Lindberg glasses by Jens karlsson on Flickr, used under a CC-BY license.


Getting Started on Professional Bios

Getting Started on Professional Bios published on

This is the post for the week of January 22, 2018.

Notes for This Week

  • Likes mean I read your post. If I like your post in the Facebook Group or your comment on a Daily Discussion Post, I read what you wrote. I reply occasionally, but I try to let the class drive the conversation. If you don’t get a Like, I simply missed reading the post or comment. Don’t worry though. It still counts as work toward a grade higher than a B in the course.
  • Chat available in Canvas. We’ll use the Chat tool in Canvas for impromptu conversations. You can use it with your groups, and I will be available there as needed. Everyone in the class can see everything you post, so don’t say anything personal or private there.
  • Writing Groups will be set up on Wednesday. Once everyone has filled out the Spring 2018 Group Preferences Survey, I will finalize your writing groups. To be sure that I include everyone, I have to wait until after the last day to add the class. I will send out an email message when the groups are set. Don’t worry about the group work until you receive that message from me.

Readings for This Week

Tasks for This Week

Here’s what you need to do for this week:

  1. Review the advice on How to Succeed in This Online Class, in the infographic above. In particular, set a schedule for getting your work done, just as you would for any other course that you take. Don’t assume that you can “fit it in.” That strategy doesn’t work out for most students.
  2. Read the Professional Bio Statement assignment, and ask any questions you have in the Professional Bio Questions Discussion in Canvas. Asking a question is not required.
  3. Get started on your Professional Bio by jotting out things you want to be sure you include and exploring the resources included in the assignment. Here are the relevant dates for the project:
    • Wed, January 31: Post a rough draft of your bio to your Writing Group in Canvas by 11:59PM.
    • Fri, February 2: Post feedback in Canvas to all your group members by 11:59PM.
    • Mon, February 5: Submit your Professional Bio Project by 11:59PM.
    • Thu, February 8: The grace period ends at 11:59PM.
  4. Connect with Writing Group after you receive my email indicating that groups are set up:
    1. Introduce yourself to your writing group by posting in the Getting Acquainted with Your Writing Group Discussion in Canvas.
    2. Collaborate to set ground rules for your writing group. The primary work of your writing group is explained in the Writing Groups Overview. To help make your work together go smoothly, your group should make a set of guidelines, or ground rules, for how you will collaborate. The readings from Chapter 19: Group Communication, Teamwork, and Leadership will help you decide on the issues that are important and how to address them.

      Use the Group Ground Rules Discussion in Canvas to work out your guidelines, which should cover all of the following:

      • Contact information that group members can use to keep in touch outside Canvas (if desired).
      • Group responsibilities (division of labor). For instance, do you want a leader? Who is responsible for making sure everyone gets feedback on drafts?
      • Group scheduling and due dates. For example, do you need group due dates for posting drafts to make sure you have time to give one another feedback?
      • Communication policies that account for how the group will deal with any issues that arise, such as someone being offline for a few days or someone disappearing without notice.
  5. By 11:59PM on Friday, January 26, write your 01/26 Labor Log in Canvas. The grace period for your log entry ends at 11:59 PM on Monday, September 29.


Note: This infographic already has a text-based transcript.


Image Credit: How to Succeed in This Online Class by Traci Gardner.


#SundayShare: Daily Discussion Post Statistics

#SundayShare: Daily Discussion Post Statistics published on 2 Comments on #SundayShare: Daily Discussion Post Statistics

Daily Discussion Post StatsSomeone in the class has asked about how frequently to respond to the Daily Discussion Posts. Her question inspired me to gather some statistics that will show you how students responded to the posts in the past.

General Advice

Think of responding to the discussion posts like participating in a course that meets in the classroom. Chime in when you have something to say, but don’t feel compelled to talk just for the sake of talking.

Counting Your Comments

You can see the number of comments you have made by finding any comment you have made on the blog and looking after your name, as shown in these examples:

Screenshot Showing the Location of Comment Count

Details on the Stats

The infographic on the right shows some stats on the comments from the Fall Semester to help you gauge what’s typical. The numbers are for four sections of the course, which works out to 88 students. These numbers are identical to the number of sections and students this term.

Out of the 88 students in the course, 61 of them commented at least once. That works out to about seven students out of every ten.

The highest number of comments by a student was 61. The average number of comments per student was 18. There were a total of 66 Daily Discussion Posts and a total of 1091 comments for the entire semester.

Those who posted more comments tended to do better in the course; but posting more is not a guarantee of an A. You have to meet all the Requirements in the course.


Note: This infographic contents is included in the text of the post, so it does not need a transcript.


#WeekendWatch: Crafting Strong Messages

#WeekendWatch: Crafting Strong Messages published on 16 Comments on #WeekendWatch: Crafting Strong Messages

Lynda.com Login Help

Lynda.com videos are free to Virginia Tech students with your VT.EDU login. Start at the VT.EDU login page to access these resources. See the notes at the end of this post on How Lynda.com Videos Work.

For our #WeekendWatch, we have our first Lynda.come video lesson, Crafting a Strong Message (4m16s) from the Writing Email course.

This video outlines three key strategies that will help you write effective email messages. With a great deal of communication in the workplace taking place in email, learning how these three strategies work will make you a more effective employee.

In addition to watching today’s video, skim the titles of the other videos for others that you can watch to improve your email messages. After watching the video, you can leave a comment on the strategies it recommends, your experience with email in the workplace, or another video lesson that you recommend.

Screenshot of the Lynda.com video Crafting a strong message

How Lynda.com Videos Work

Lynda.com courses are comprised of a series of video lessons. Typically, I will ask you to watch one or two lessons to learn more about a particular concept or skill.

The site is designed so that you can easily watch an entire course, with the individual video lessons autoplaying one right after the other. It certainly won’t hurt you to watch more than I am recommending, but realize that I do not typically ask you to watch an entire course.


Note: This video has closed captioning, so it does not need a transcript.


#FridayFact: Writing Strong Emails Matters

#FridayFact: Writing Strong Emails Matters published on 37 Comments on #FridayFact: Writing Strong Emails Matters

#FridayFact: Writing Strong Emails Matters
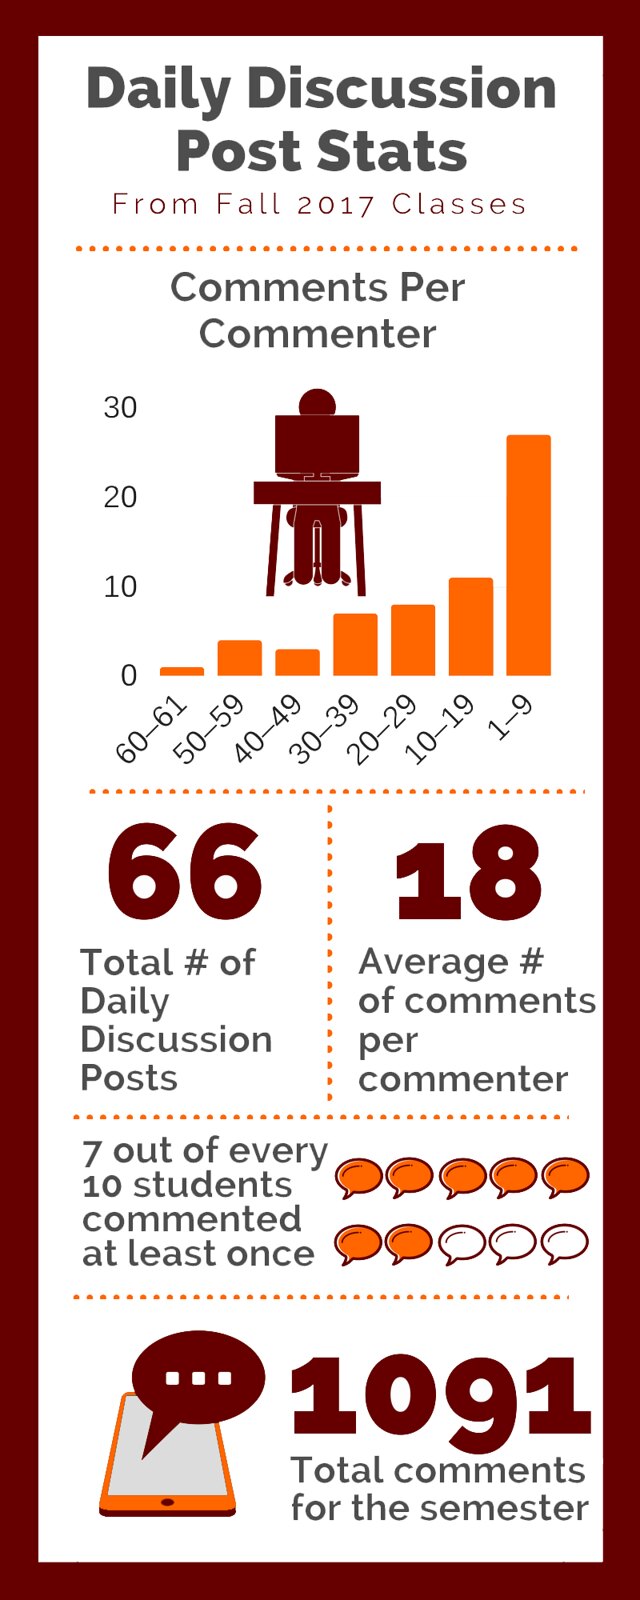
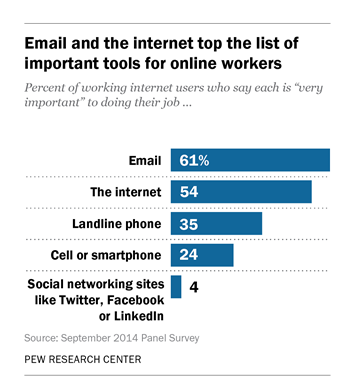
Email is critical to the work of over half of the workers surveyed by the Pew Research Center on Technology’s Impact on Workers. The bar graph on the right shows that 61% of workers said that email was “very important” to their work.

Why Strong Emails Matters

The better you are at writing emails, the better you are likely to do in the workplace. As more businesses and organizations skip paper-based communication and turn to email, you will find that you spend a great deal of time reading, writing, and responding to email messages in the workplace. With email such an important part of the work that people do, learning the strategies that ensure your messages get read and accomplish their goals is crucial.

How to Write Strong Emails

To improve your email savvy, consider these tips on writing the subject for your email messages. If you want your email message to be read, you need a subject line that gives readers a short description of the contents in a way that piques their interest in the topic. When a subject line doesn’t, it’s possible that people will just skip on to something else in their inboxes that is interesting or has a clear purpose.

So how do you make sure you have strong subject lines? Here are ten tips:

  1. Be sure you have a subject line in the first place. Email without a subject grabs no one’s attention.
  2. Think about your audience and purpose. Your subject should summarize your purpose in a way that the audience will understand.
  3. Keep it short, since only the first few words are going to show up in the receiver’s inbox. Stick to 50 characters or less.
  4. Put the most important words at the beginning. If your subject line does get cut off, you want to be sure the words that matter are visible. Additionally, people skimming down their inboxes look at the beginning of the subject, not the ends.
  5. Be specific. “Upcoming Trip” leaves the reader wondering whose trip and to where. “Your Upcoming Trip to NYC” is much clearer.
  6. Avoid all caps. Nobody likes all caps.
  7. Use emoji sparingly. If you aren’t sure that your recipient will know what the emoji means, don’t use it.
  8. Make the subject unique. If that subject could be added to nearly anyone’s message, try again. For instance, “A Question for You” could go on any email that asks the recipient a question. “Question About New Invoice System” tells the recipient exactly what to expect in the message.
  9. Think of your subject line like a headline for a news story. Make it click-worthy (but avoid misleading subjects that seem more like clickbait).
  10. Use title case, capitalizing every important word. Never use all lower-case, since it looks unpolished and less professional.


Note: This bar graph already has a transcript.


#InfographicInspiration: Writing Email That Gets Read

#InfographicInspiration: Writing Email That Gets Read published on 37 Comments on #InfographicInspiration: Writing Email That Gets Read

For our #infographicInspiration this week, I’m sharing a simple image that identifies key characteristics of effective email messages.

The website’s name is off-color, but the information clearly and concisely outlines specific ways to improve your email messages. Read more information about the infographic in the article 10 tips for effective email. Compare the parts of an email message that are identified here to those in the infographic from yesterday’s post.

Infographic: Email that works

Note: This infographic needs a text-based transcript. See the Optional Accessibility Transcript Activity for more details.


#WednesdayWrite: Emails to Your Professors

#WednesdayWrite: Emails to Your Professors published on 63 Comments on #WednesdayWrite: Emails to Your Professors

This post is the first of our Daily Discussion Posts. If you decide to leave a comment as part of your work toward a grade higher than a B in the course, remember that I have to approve your first comment on the site manually. Your comments will appear automatically on the site after I approve your first post.

Anatomy of a Perfect Business Email
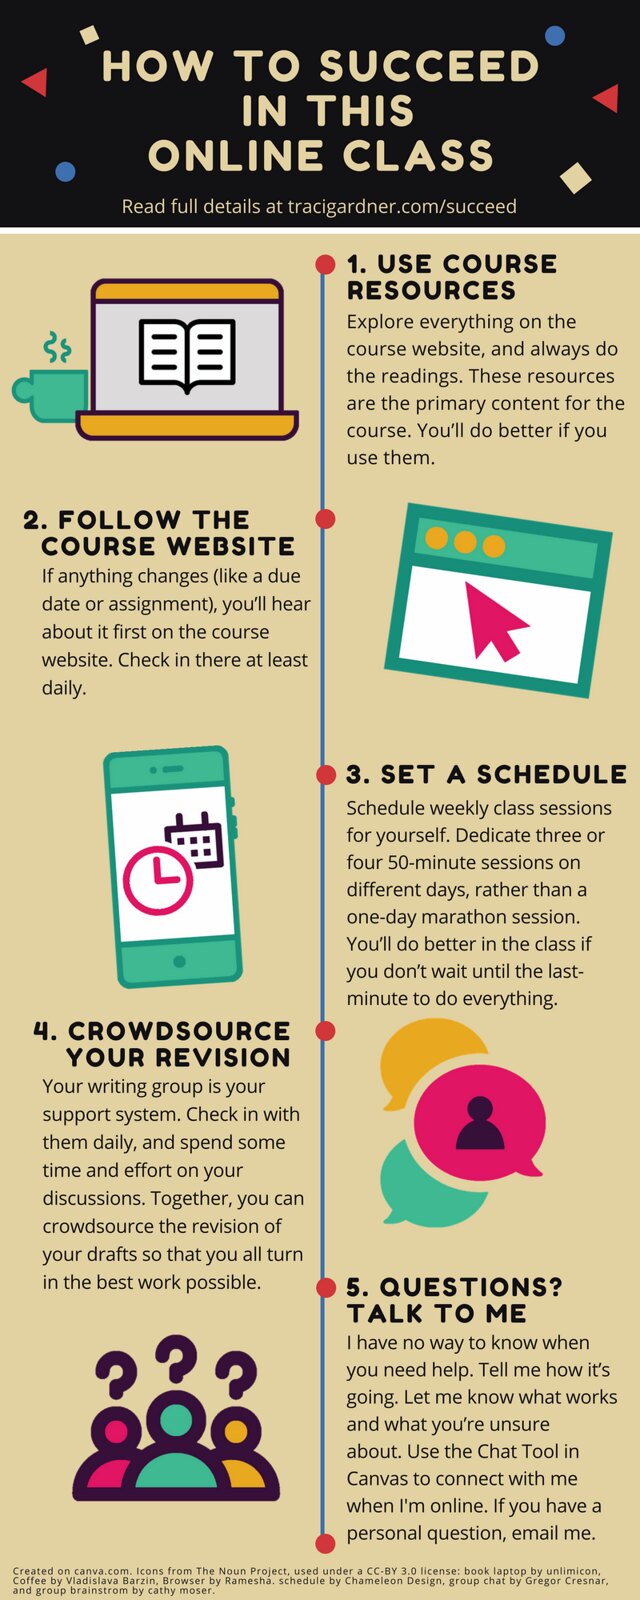
Everyone in this course has had to write to a teacher at some point. You may have had a question about an assignment, needed an extension on a project, or wanted to explain a class absence.

The Inside Higher Ed article “Re: Your Recent Email to Your Professor” outlines tips for how to write email messages that persuade your professors to help you.

As a bonus, you can also consult the infographic on the right, which outlines the parts that comprise a perfect business email message:

  • Subject Line
  • Greeting
  • Introduction
  • Main Body
  • Closing Remarks
  • Closing Signature

Depending upon the purpose and audience of your message, the length of these sections may vary greatly. There’s no reason to pad your message out for a short request, for instance. Adding extraneous information in that way just buries the point you are trying to make. Use common sense.

Reflecting on these resources, what experiences or examples can you share that relate to writing to professors? What other advice have professors given you about writing to them? How would you compare writing to professors to writing to your manager or another executive in the workplace?


Note: This infographic needs a text-based transcript. See the Optional Accessibility Transcript Activity for more details.


Introduction to Technical Writing

Introduction to Technical Writing published on

This is the post for the week of January 16, 2018.

Welcome to Technical Writing. This is the course website for these four courses, all taught by Traci Gardner at Virginia Tech during Spring Semester 2018:

  • English 3764 (Technical Writing), CRN #14087
  • English 3764 (Technical Writing), CRN #14088
  • English 3764 (Technical Writing), CRN #14089
  • English 3764 (Technical Writing), CRN #14105

Information on all assignments, weekly activities, and related resources for these courses will be posted here. Check this site regularly for the details on what to do for the course.

Notes for This Week

  • Daily Discussion Posts: This week’s Daily Discussion Posts will focus on writing effective email messages. While you do not have a major project that focuses specifically on email, it is still an important kind of writing no matter what career you are pursuing.
  • Work Hours: Normally, I am online from late afternoon through early morning hours. I’m not a morning person. So look for responses from me during those hours.

Readings for This Week

Tasks for This Week

You will notice that there are a lot of tasks. I try to post everything that you need to do at the beginning of each week. In my experience, online students have to fit work for this course in around many other responsibilities. By posting everything at the beginning of the week, I hope that I give you enough lead time to fit the coursework around your other obligations.

Here’s what you need to do for this week:

  1. Complete the Course Overview Module in Canvas. You will read the various course documents and then take a syllabus verification quiz. The quiz is due by 11:59PM Friday, January 19. The grace period for the quiz ends at 11:59PM Tuesday, January 23 (you get an extra day because Monday is the last day to add classes).
  2. Confirm that your notifications in Canvas are set the way you want them. Note that Canvas uses your notification preferences to determine whether to email you or text you (or not tell you at all) about information on the site. See the section "How do I adjust my notification preferences?" in the Student Getting Started with Canvas Guide for more information on setting up your notifications.
  3. Add a professional profile picture to your Canvas account. Follow the Canvas documentation to add a profile picture in your user account. Since this is an online course, your profile picture helps me see you as more than just a name on the course roll.
  4. Fill out the Spring 2018 Group Preferences Survey so that I can arrange your writing groups. Responses are due by 11:59PM Friday, January 19. The grace period for the survey ends at 11:59PM Tuesday, January 23 (again, you get an extra day because of Monday is the last day to add classes). You will begin working with your group next week.
  5. Watch this site or Announcements in Canvas during the week for our Daily Discussion Posts for the week. You can add a comment if you’re working toward a grade higher than a B or try one of the other options. Remember that I have to approve your first comment before it appears on the site.
  6. Join the optional Facebook Group if you are interested in participating there as you work toward a grade higher than a B. Check the Optional Facebook Group page for more details on this option. I will confirm your membership in the group manually, checking it against the course roll to keep spammers out.
  7. By 11:59PM on Friday, January 19, write your 01/19 Labor Log in Canvas. Read more details on Labor Logs page. The grace period for your log entry ends at 11:59 PM on Tuesday, January 23 (ditto on the extra day here too).


Note: This infographic needs a text-based transcript. See the Optional Accessibility Transcript Activity for more details.


Image Credit: Why Good Writing Is Needed for Better Jobs from Grammarly.


Primary Sidebar